Building your own aquarium
(Part 2) (Part 1 is here) I wonder how many stands are out there waiting for this month’s issue. If you have followed my directions in part one, by now there should be a wonderful empty stand just begging for a tank to grace it!So, let’s get down to the easy part! Building a fish tank isn’t as daunting as you might think. It’s all down to simple assembly techniques, and if you follow a few basic rules, the tank will take you no longer than a couple of hours to put together.
Ok, here’s what you need to build the tank:
Tools:
A silicon gun A sharp blade/craft knife Paint scraper Emery cloth or similar abrasive sheet. (Not sandpaper) A teaspoon with a rounded handle
Materials:
All the measurements below need to be exact, so I would recommend that unless you are proficient at glass cutting, you take the list to the professionals. All glass referred to here is float or plate glass, (standard window glass), not toughened!
1 off x 7/16” (10mm x 48” (1220mm) x 20” (500mm) Bottom Panel 2 off x ¼” (6mm) x 48” (1220) x 17 1/8” (435) Front & Back Panels 2 off x ¼” (6mm) x19 ½” (495) x 17 1/8” (435) Side Panels 2 off x ¼” (6mm) x 46” (1168) x 2” (50) Front and back Stress Bars 3 off x ¼” (6mm) x 19 ¾” (502) x 4” (100) Cross-stress Bars 3 tubes of aquarium safe silicon Roll of masking/Duck tape Methylated Spirit or alcohol Clean rags
That’s a nice short list! You can print this out and take it to the glazier so that he can cut the panels for you.
When you have the glass all nicely cut to size, you need to clear a flat surface large enough to take the full size of the bottom panel.
Check the glass panels for blemishes, weaknesses, cracks or chips. If you find any, take it back and get it replaced! Use the emery cloth to polish all the edges and remove the sharp edge, so you don’t cut your hands while working on the build. All edges should be polished to a smooth finish with no sharp edges. (Don’t round the edge too much, since it reduces the surface area the silicon has to bond to.)
Once all the edges are cleaned, take the methylated spirit or alcohol and apply to the entire surface to remove any grease, dirt or finger marks from the edges in particular. The reason for using a spirit is that the liquid evaporates quickly and leaves no film afterwards.
Once all the panels are cleaned and polished, take the front and back panels. One at a time, place them on the work surface and follow the procedure here.
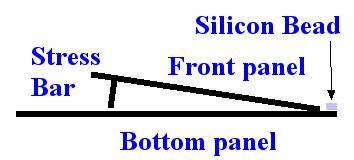
Take a felt pen and mark a line 1” (25mm) from the top, full length. Turn the panel over so that you can see the line through the glass. . Take the silicon gun, complete with tube and nozzle. Cut the nozzle about ½” (12mm) from the end at a 45 degree angle. This will give you a ¼” (6mm) bead of silicon. (You might want to practice this if you are not used to silicon, as it can be difficult to master).
Run a bead of silicon along the line from one end to the other, starting 1” (25mm) in from the end and finishing 1” (25mm) short of the other end. Take one of the long stress bars and stand it on the silicon bead, at right angles to the front panel, pressing down firmly. Hold it in place with a long piece of tape at either end. Run another bead of silicon down both sides of the joint and smooth with either a teaspoon handle or your finger. This should leave a nice rounded bead all the way along both sides.

Leave this to cure for at least an hour before attempting anything else. (Ideally, this should be left overnight).
Once the stress bars are stable, lay the bottom panel on the work surface. Take the tape and cut strips about 4” (100mm) long. You will need quite a few of these strips to hold the joints together while the silicon cures, socut about 10 at a time and have them ready. Lift the front and back edges of the panel and apply tape to the underside, leaving about 2” (50mm) sticking out, sticky side up. Repeat on the sides of the panel, so that there are tape ends all round the panel.
Take the front panel and lay it onto the bottom panel roughly ½” (12mm) from the front edge, making sure that the stress bar is furthest away from the joint, and resting on the bottom panel. (It’s not easy to explain in words, so I have a sketch here:
 Run the bead of silicon evenly down the full length of the front edge of the bottom panel, using the front panel as a guide. The bead needs to be right against the edge, where the glass will sit.
Lift the front panel onto the silicon bead, making sure that it is flush at the ends and level with the edge of the bottom panel. When you are sure that it’s right, press it down firmly to squeeze out any air and lift the tapestrips round the edge and onto the front panel to secure the joint. Have a friend hold this in place while you prepare one of the side panels. Bead the edge of the bottom panel and the inside edge of the front panel as before and carefully position the side panel in place, pressing it firmly to remove any air from the joint. Put some tape round the joint from front to side to secure this joint and from the bottom to side to hold that joint in place.
Repeat the procedure with the other end panel, giving you a three sided assembly. The forth panel should now fit onto the edge of the bottom panel and complete the tank. Tape all the joints to keep them in place while the silicon cures.
With all sides in place and the silicon starting to cure, take your paint scraper and clean off excess from the inside edges of all the joints. Run a bead of fresh silicon into the inside corners of all joints and smooth with the teaspoon handle or your finger to give a rounded finish on all the inner corners. This will strengthen and waterproof all the joints, as well as giving a nice finish to the inside.
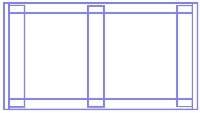
All that is left now, is to secure the cross-stress bars from front to back. You have two choices here, above or below the stress bars. I tend to put them on top, it makes it easier!
Put a generous blob or two of silicon on each end of the cross-stress bar and place onto the front and back stress bars. Press very firmly in place, squeezing the silicon in between the two pieces of glass. The position of these is not critical, but I would suggest that you position one at each end, leaving a gap between the bar and the side panel of the tank for wires and tubes, and one centrally, mid way, to support the front and back panels. You should end up with something like this:
 Clean off any excess silicon that squeezes out of the joints, and using spirit and a cloth, carefully remove any smudges of silicon from the glass where you have been working and got it on your fingers! You can use the craft knife to trim the silicon beads if they are not straight, or scrape any cured silicon off the glass.
The tank is now complete! Leave the assembly to cure for 24 hours before testing it for leaks. If all goes well, you can then put the tank onto the stand that you built last week and start to decorate it in whatever fashion you choose! Of course, there is one thing missing. There is no light canopy for this! I will detail how to build the lighting canopy next month, or you can just follow the DIY canopy instructions in the DIY section of the forum if you can’t wait!
Enjoy!