Instructions how to create a stunning fish tank display for your home
by Tim Gautrey
This instruction is not for the faint-hearted and definitely for the more skilled DIY enthusiast.
The object is to build a display tank unlike any other, where your fish can be displayed in all their beautiful colours with plenty of room to move around.
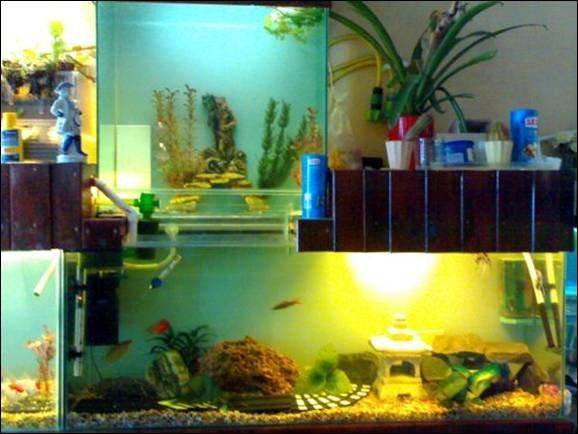
This build involves a 48” x 18” x 12” standard fish tank as a base unit. This needs to be either built onto a custom stand or use a stand capable of being placed 6” away from the wall and strong enough to carry a lot more weight than the tank itself. I opted to build the stand myself out of 4” x 2” timber and flooring grade chipboard, fixed to the wall along the back.
The stand was constructed 12’3” long (since it also took an 8’ tank), and 18” front to back, at 30” from the floor to the top surface. The whole thing had to be perfectly level in all directions. Cross bars were placed every 24” along the length to avoid distortion of the chipboard. It has to be very strong because it isn’t just supporting one tank, but two!
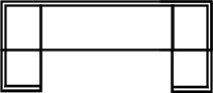
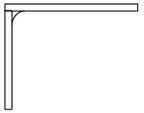
Once the stand is finished, the 48” tank needs to be positioned 5” from the wall to the back panel, leaving room for wiring, piping and supports behind the tank. A frame then needs to be made to run from the front of the tank to the wall, with support legs running down behind the tank to the shelf. This can also be fixed to the wall for additional support if required, but I chose not to do this, since when the tank fills up, the shelf may settle, shifting the weight onto the support fixings and unbalancing the top tank. This support needs to be positioned to line up with the cross-stress bars on the 4’ tank, which should be around 24” apart, and will almost certainly be offset to one side. If your tank has no central cross-stress bar, then you can position the stand anywhere you like. Wherever it is positioned, it is very important that you fit a back support between the two bars, to support the top tank at the back, when it overhangs backwards.
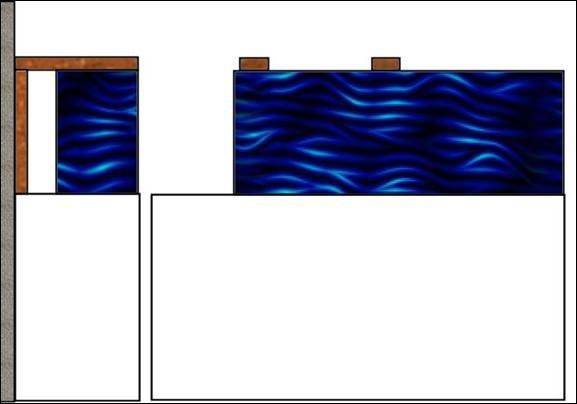
The image above should clarify this. So far it’s been easy, although you have probably taken several days to get this far!
Next is to measure for the glass of the top tank. As a guide, I built mine 24” x 24” x 11” using 6mm float glass. You can make this tank almost any size you want, but be aware of two things: Firstly the weight of water in the tank, which is being supported solely by the tank below and the support frame, and secondly, the depth of the water in the top tank, which affects the glass thickness.
Let’s work on the sizes I used, since they are proven.
Below is the cutting list, with details of what each piece does:
- 1 x Top Panel: 24” x 11” Top
- 2 x Side panels: 23½” x 10½” Side Panels Allow for front/rear and top/bottom glass thickness
- 1 x Rear Panel: 23 ½” x 24”
- 1 x Front Panel: 23 ½” x 24”
- 1 x Bottom Panel:
The bottom is made up of several pieces to give you a shape like below:
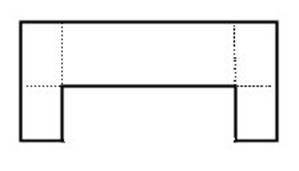
- 1 x 24” x 6” Full length back
- 2 x 4” x 5” Front side sections
- 2 x 10 ½” x 3 ¾” Side sections (inside fitting)
- 1 x 16” x 5 ¾” back section (inside fitting)
If you know a glazier that can cut the shape out of one piece of 10mm glass, it is better, but I couldn’t, so ended up making a laminated bottom panel as above crossing the joins for strength. To improve the water seal and strength further, the inner laminated sections fit inside the tank, sealing against the side, front and back panels.
The flute:
This is probably the most important part of the whole tank, as it connects the two tanks together and allows for the water to flow into the top tank. The bottom of the flute must be 4” below the bottom tank water level, so that you can still perform partial water changes without flooding the room! The glass needed for this is:
- 2 x 15 ½” x 7 ½”
- 2 x 5” x 7 ½”
There is a joiner needed here on the front panel, to join the flute to the bottom of the panel:
1 x 16” x 3”
You also need a stress bar on the front panel to support the flute area:
1 x 22” x 1 ½”
That’s the glass cutting list. If you wish to design your own size tank, just use these as a guide and increase/decrease the overall dimensions.
Once you have the glass cut, you need to assemble a few tools and things to put it all together:
- 2 tubes of aquarium safe silicon
- 1 roll of masking/box tape
- 1 bottle of methylated spirits
- Several sheets of emery paper
- A sharp knife
- A mastic gun for the silicon
- A selection of cloths and paper towels
- A spoon (with a rounded handle)
- A work top, very flat and very clean, large enough to do the assembly on
Assembly:
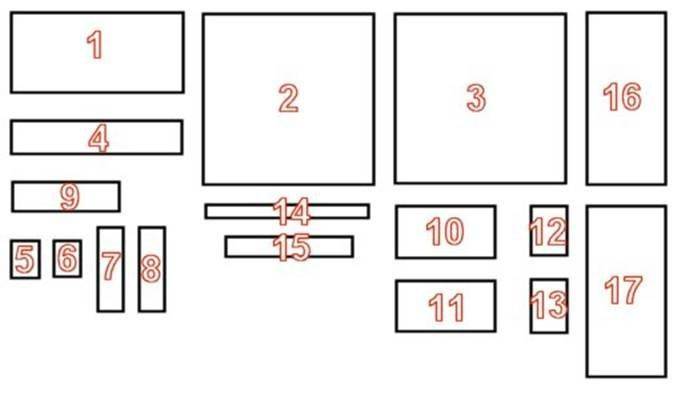
To make this easier, I have drawn the parts and put numbers on them. Print the sheet out, so you have a guide for this:
Assembly of bottom panel:
Take 4, 5 and 6. Place 4 flat on the work surface. Wipe the edges all round with methylated spirits to remove any traces of grease. (Be careful, all the edges are raw and very sharp!). Take 5 and wipe the edges as above. Be careful to ensure you have this piece the right way, since there is only ½” difference. Run a bead of silicon along the shortest edge and press firmly against the edge of 4 to squeeze out the air, flush with the end. This will form an “L” shape.
Clean the surface of the joined area with Meths and snake a bead of silicon from the front to the back across the join. Take 7, clean the face and firmly place it over the joined pieces, flush with the inner edge of 5 and centrally front to back. Press firmly and try to remove all the air bubbles from the join. You should end up with three pieces joined together, with a recess of ¼” on the outer and back edge, as the image below:

Repeat the operation on the other side using 6 and 8, and insert 9 flush with the inner edge of 4 to complete the bottom. The result should look like this:
Put this carefully off to one side, clean excess silicon off of all the edges and leave to cure. If you have any very heavy weights to hand, you could sandwich between two pieces of chipboard and place the weights evenly on top, which will help to ensure that all the air is squeezed out. Of course, if you have managed to find a glazier to cut this shape anyway, this part is not required.
The main build
Ok, the base is curing, so while you’re waiting, you may as well put the rest of the tank together. Start with piece 1, clean it off and lay flat on the work surface. Take piece 3, the back panel, and clean the edges as above. Take the masking tape and cut about two dozen 6” strips ready for the assembly. You will also need a friend to help here.
Run a bead of silicon along one edge of 3. Rest the silicon on the edge of 1, so that it sits on top, flush with the outside edge and flush with the corners. Take a couple of pieces of tape, and with your friend’s help, tape the joint. This will be very unstable at the moment, so be very careful that it doesn’t move out of line. Take 16, clean and bead the top and one side, and press firmly onto 1 and inside the edge of 3, flushing all the outer edges. Tape the joints to hold everything firmly. Repeat with the other side, using 17. You now have three sides and the top of the tank. Next, run a bead of silicon down the inside of each join and use the spoon handle, (or your finger), to smooth it into a nice curve, like this:
Next is the front panel, to make the whole square. As before, clean the edges and bead the inside of both sides and the top edge, press firmly into place and tape, bead the inside of the joints and smooth out.
I have purposely left the stress bar till now, so that it can be lined up easily. Mark the outside of the front panel 2” from the bottom on both sides with a felt pen. Now very carefully turn the whole assembly over so the front is now facing down on the work surface. Lay the stress bar centrally above the marks, to give you a nice straight guide for the silicon bead. Bead along the bar, and then just stand it up onto the silicon. Press it firmly into place, and run a silicon bead along both sides and smooth. This assembly will now need to be left to cure before fitting the bottom panel and flute.
Fitting the bottom panel
This should be simple, you’d think, after getting all the other joints together and it was so easy! But there are major differences with this panel over the others. For a start, it’s been made up of several pieces and it also has a recess that has to fit inside the other panels. Why?
This panel will have to hold the weight of a lot of water, and needs to be much stronger than the rest, it also has to support the tank itself on a wooden framework that we hope is all nice and level, but timber isn’t the easiest to join and get level!
To fit the bottom panel, it is important to ensure that there are no lumps of cured silicon on the edges to be joined. Run the sharp blade along the inner edge of the recess to remove any silicon that has squeezed out during the curing. Also, use the emery paper to smooth off the sharp edges around the inner edges of the “C”, so that you don’t cut yourself when you bead it in! Now run a fresh bead of silicon all the way around the recess and firmly position it into the square that is waiting. Make sure that you get it the right way around, with the open side to the front. Once you have it firmly taped in place, run a bead around the inside of the panel, sealing the recessed part of the panel against the glass. It sounds complicated, but it’s actually quite easy, so long as everything else is right!
Fitting the flute
Why not fit this before putting the bottom panel on? Simply to make it easier to get your hands inside the tank to seal around the bottom!
Take piece 12 and clean, bead and firmly position on the inside of the opening, left hand side. Tape in place. Do the same with piece 13 for the opposite side. Take 10 and 11 and fit them in between the other two. Ease the sides outwards slightly to allow for the joints to seal in place. Tape it round to hold it all together and then fit the last piece, 9 across the butt joint on the front by snaking the silicon across the join and pressing it firmly on, squeezing all the air out.
All that is left to do now is to polish all the exposed corners to remove the sharp edges. Don’t forget the stress bar and the bottom of the flute. Any excess silicon can be cleaned off with a sharp blade. When done it should look like this:
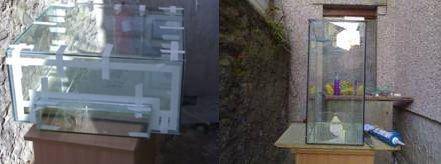
The build is complete! Let the silicon cure fully before leak testing. I left it for about 24 hours to cure.
Before you can perform a leak test, you need to construct a vacuum pump. This is essentially an air pump working backwards. There is a simple way to do this, and this is how I achieved it:
Making a vacuum pump
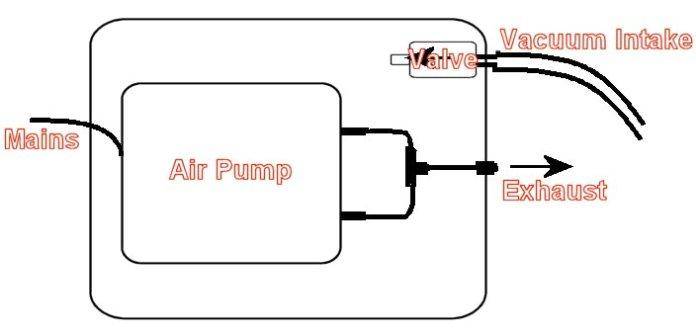
Take a standard twin outlet air pump. Place it into an airtight container and make two holes the right size to take 6mm airline. You can use standard 6mm fittings or buy a couple of nipples if you prefer. Fit a short piece of airline to the outlets from the pump, connect a tee piece and run a single line to the first connector or run it straight through the side. This is the exhaust for the pump.
Take a one-way valve and connect it to the other hole, with the flow indicator facing the box. This is essential, since if the pump is switched off, you don’t want air to flow back into the tank. See the drawing below:
Make a hole for the mains cable, feed it through and seal all the holes with silicon. Fit the lid and seal this if necessary. I found a take-away container was just big enough for this task.
You now have a vacuum pump for the task, which is not fast, but will do the job very well. You could use almost any air pump for this, but aquarium pumps are cheap and effective.
Next you need to be able to get the vacuum pipe into the tank and ensure that it stays above the water at all times. If you want to include a bubble stream as a feature in this tank, then you may want to drill a hole in the glass top panel to fit a tap or pipe connector, but personally I found this to be problematic with this design of vacuum pump, as the condensation eventually shorted out the electrics inside the pump, but if you have a different way to do it, carry on!
I found the easiest way to get the vacuum pipe into the tank was to take a 30” length of plastic water pipe, feed the air tube up the centre and seal it at the top and bottom. This effectively formed a floatation device, ensuring that the intake was always above the water. A second check-valve inline here is also a good idea, just to ensure there is no reverse flow when you disconnect from the pump. A good length of air piping to go from the wand to the pump and you’re ready to go!
Leak Testing
How do you leak test? Not as easy as with a normal tank and here you need to get inventive. Remember that when this tank is operational, it is upside down, so just filling it with water won’t work. Two reasons for this; firstly, you will be putting pressure on the top of the tank, not the bottom, which is almost certain to break the top panel. This size of tank holds 22 gallons imperial, which is quite a weight of water! Secondly, the tank has to maintain a vacuum. If you just fill it up, small leaks may not be apparent, which can be disastrous when you finally have it in place. Consider that you are increasing the volume of the bottom tank by more than 50% more than it can hold. If the vacuum fails, all that water will drop into the bottom tank, overflowing it onto the floor!
Here you need a container like a bath or similar, big enough to be able to mount the tank on some blocks inside so that you can get the lip of the flute under water. I used my bath for this for two reasons: It was easy to control the water level while testing, and if the test failed, the water was contained!
Make a temporary stand in the bottom of the bath, high enough to allow the flute to be clear of the bottom and substantial enough to support the entire bottom of the tank. Place the tank, right way up on the stand and insert the wand into the tank. Connect it up to the vacuum pump and start the pump. Put the plug in the bath and start to fill it slowly until the level reaches the flute neck. Slow the flow down, so that the flute remains under the water while the tank fills up. As the water level rises, any leaks will show straight away as streams of air bubbles rising in the water. As you find them, mark them for repair later and continue to fill. If the water doesn’t rise into the tank, you have a major leak somewhere, which you should be able to see anyway!
Once the tank is full to within 1” of the top panel, remove the wand, mark the level and leave for 24 hours. If you have done a good job, the level will stay exactly where you left it. Any leak at all will show itself very quickly, so keep checking. Remember to keep the water level in the bath above the neck of the flute at all times; otherwise the tank will empty violently!
If the level has maintained for 24 hours, the tank is ready to use. Empty it using the wand, by removing the check valve and allowing the air in slowly. Don’t be tempted to just empty the bath, as once the water level drops below the flute neck, air will rush in very violently and could cause failure of the tank, even to the point of breaking it!
Providing the leak test succeeded, you are now ready to fit the tank on it’s stand and fill it. You may need help with this, as it is a little difficult to lift the tank in place with the flute hanging down. Place it carefully on the stand, with some wadding or felt underneath, just in case there are any uneven places on the stand. Once in place, push it as far back as it can go, until the flute touches the rear stress bar. This leaves an open space at the front of the tank for access and maintenance. Repeat the filling procedure, running water into the bottom tank at the same rate as before to maintain the level above the flute neck.
Last thing to do, is to create circulation in the tank. It needs a current in there to make sure the water doesn’t become stagnant or too warm. I used a washing machine pump for mine, but a power-head filter with a pipe connected to the outlet and turned up into the tank works really well. An air feature will also create the circulation it needs, and look good too, but this is your choice.
All you need to do now is light it, and that means building a light canopy to suit your particular setup. I used low energy bulbs for the main tank and a fluorescent tube rested on top of the top tank, surrounding it all with a custom wooden cover.
All done, and now sit back and enjoy watching the fish swimming up and down at will. Invite your friends round for a coffee and watch their faces as they admire your work!
Hints and tips
Cleaning: Cleaning is not easy. If algae starts to build up in there, it is hard work to remove it by hand, so get a plec! Magnetic glass cleaners are invaluable here too!
Water changes: You do not need to empty the tank every time you do a water change. Just take care not to let the water level drop below the flute neck when performing changes. The water in the top tank is constantly being refreshed through the circulation of the pump, so it needs no further attention.
Décor: You can use the shelf at the back to add décor to the tank if you wish. The back can have standard aquarium backing sheets or paint or any other décor, just as the normal tank, but bear this in mind when you put it in place, as it may be more difficult to change it once it’s filled.
Other air features: If you have air features in the main tank, make sure that they don’t bubble into the top tank, as they will reduce the vacuum and lower the water level in there, increasing the level in the bottom tank and potentially flooding the room!
Special Tools: You may find it necessary to develop special tools to perform maintenance, but ingenuity works wonders. As time goes by, you will develop a range of tools specifically for removing, cleaning and maintaining this tank as you need them.
Breeding: Some of the fish will find this an irresistible place to breed. Bettas, Gouramis, Angels and others love this as a breeding tank. It’s warm, easy to protect, undisturbed and they just can’t resist it, so if you have pairs, expect to be surprised!